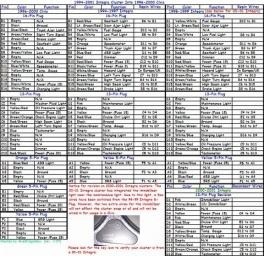
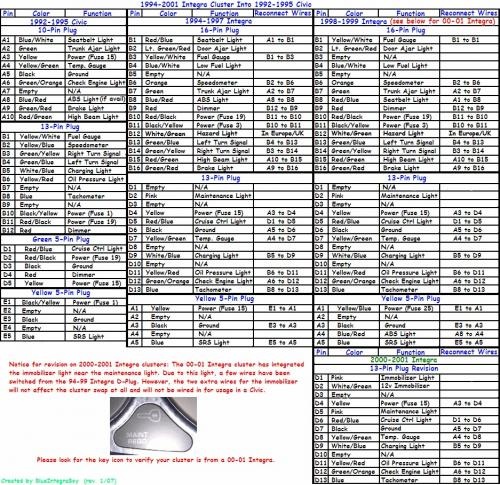
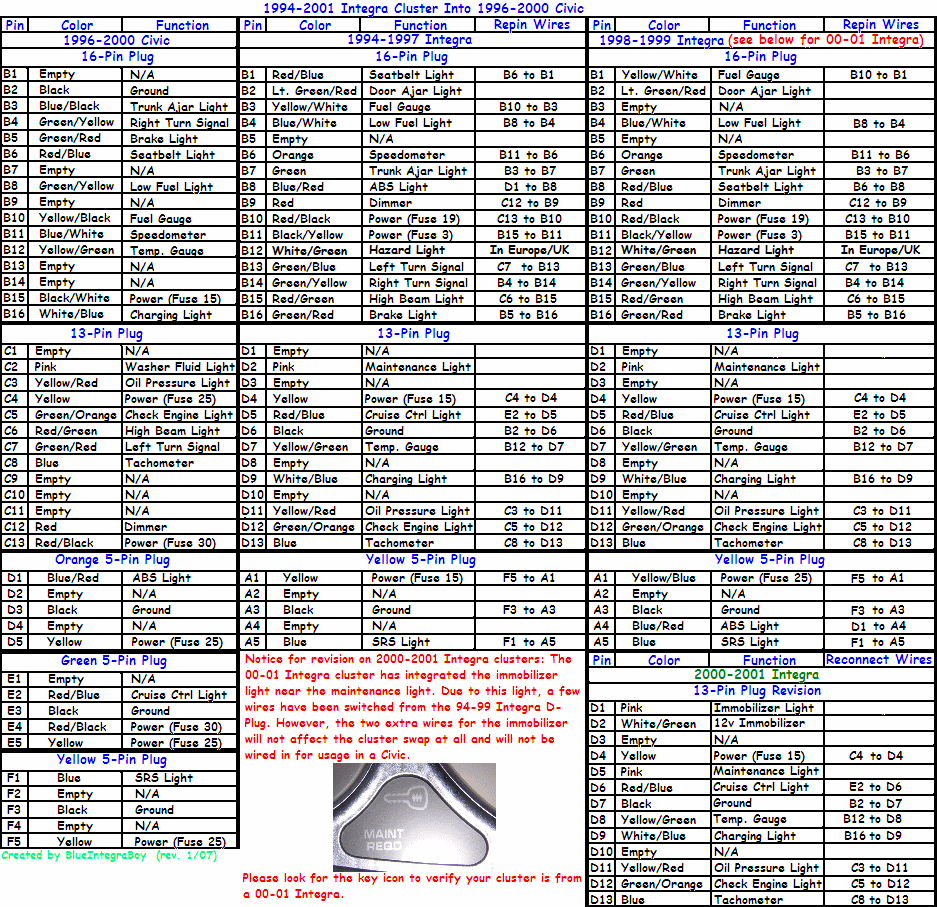
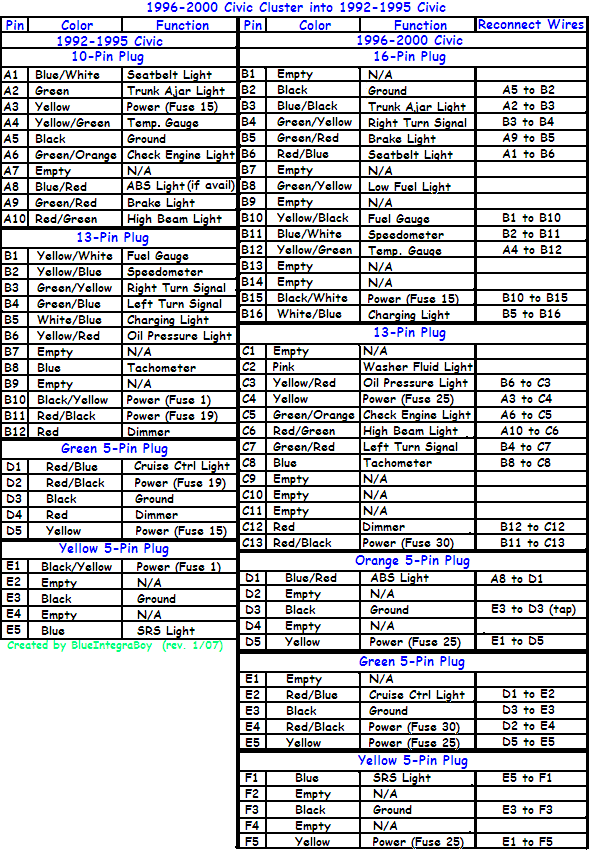
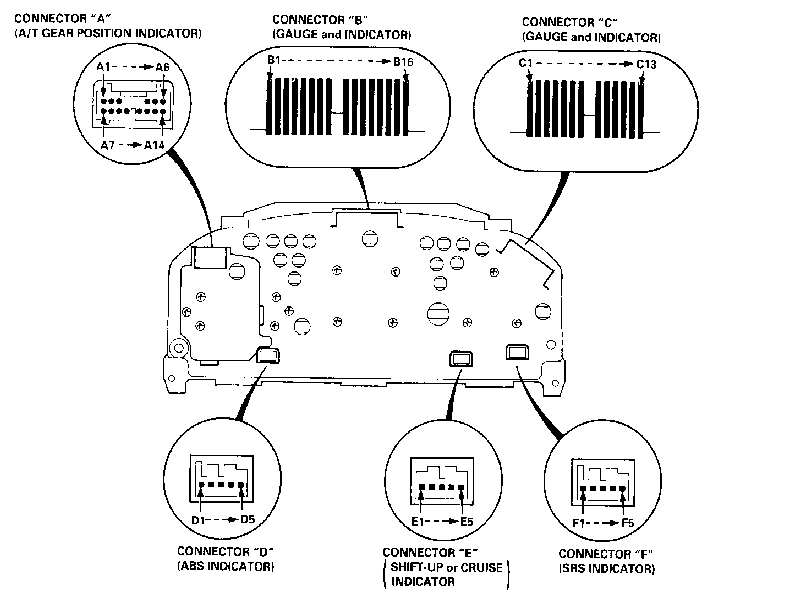
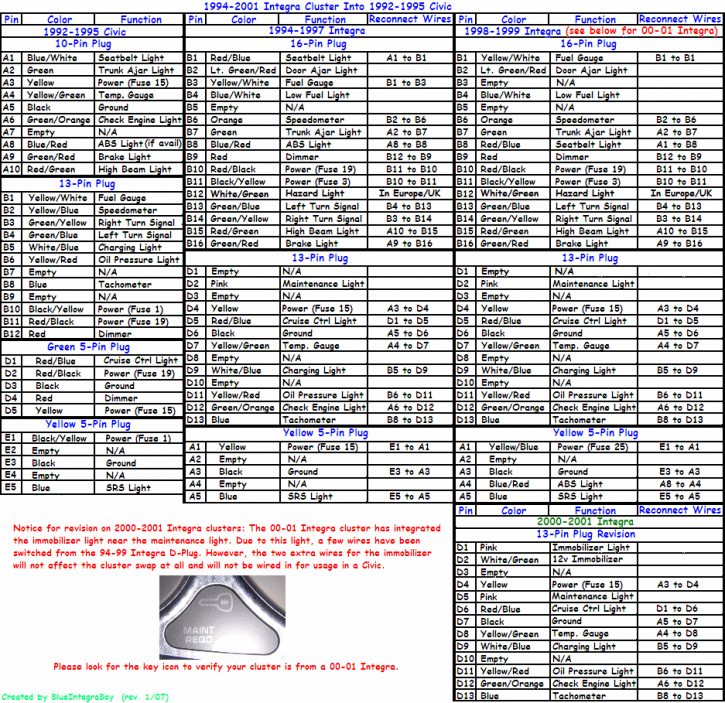
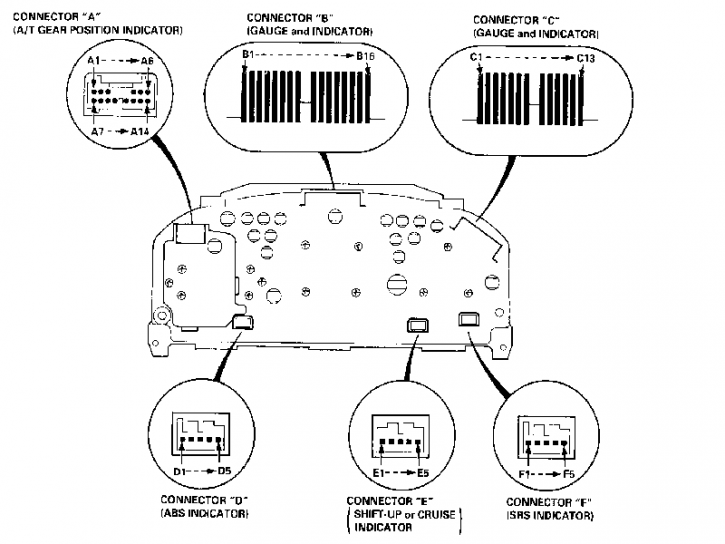
94-97/98-01 Integra Cluster Into 92-95/96-00 Civic Wiring Diagrams
I am tired of people asking where they can get diagrams to wire or repin an Integra cluster into their Civics. I took my time and searched the different wiring diagrams. I made my own diagrams for easy use. I made two diagrams for each 92-95 Civics and 96-00 Civics due to the different Integra clusters (94-97 and 98-01). I also included a diagram to wiring a 96-00 Civic cluster into a 92-95 Civic. Use at your own risk, I won't be responsible if your clusters go wacky.
NOTE: JDM Integra Type-R clusters will work with these diagrams. Make sure you know which spec cluster you have. 96 Spec will have a catalytic converter icon near the CEL and the 98 Spec do not. Use the 94-97 Integra diagram for 96 Spec and 98-01 Integra diagram for 98 Spec.
ANOTHER NOTE: To tell the difference between a 94-97 and 98-01 clusters is that the 94-97 clusters have grey gauge faces while the 98-01 clusters have black gauge faces. Also, 94-97 clusters have the seatbelt, door ajar, and SRS lights in the upper right light grouping, whle the 98-01 clusters have door ajar, ABS, and SRS in the upper right light grouping.
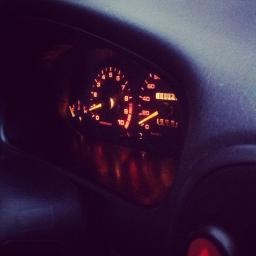
EXAMPLE: 96 Spec Integra Type-R Cluster
- Приборка от Integra DC2 TypeR в Civic EK EJ - 01-96Spec.jpg (40.02 КБ) 7470 просмотров
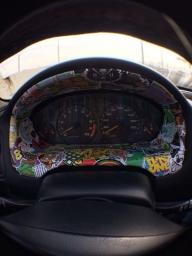
(приборка интегры в сивик 5 поколения)
- (нажмите на картинку для увеличения изображения)
(приборка интегры в сивик 6 поколения)

- (нажмите на картинку для увеличения изображения)
(приборка от сивика 6'ого поколения в 5'ое)

- (нажмите на картинку для увеличения изображения)

- (нажмите на картинку для увеличения изображения)
- (нажмите на картинку для увеличения изображения)

- (нажмите на картинку для увеличения изображения)
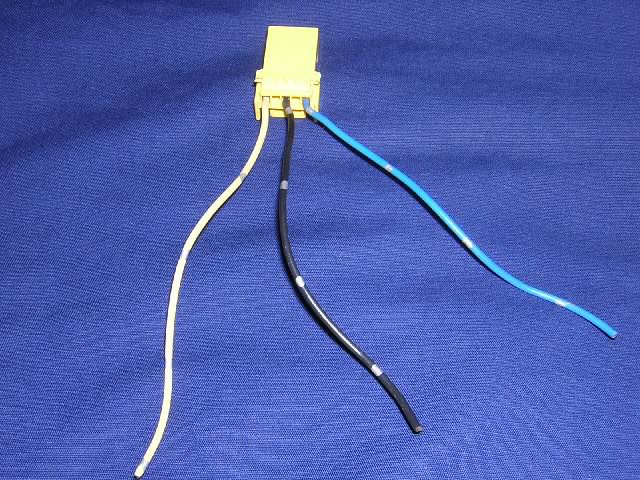
Below is a picture of a Civic SRS plug. Notice that when the clip part is facing down, the yellow wire is of the left if the plug is facing away from you. The blue wire is one the right if the plug is facing away from you. You can use your Civic SRS plug with the Integra cluster. All you need to do is cut the yellow and blue wires and switch them (connect yellow to blue, and blue to yellow). So if this was an Integrs SRS plug, the yellow wire would be on the right, while the blue wire will be on the left; the plug again facing away from you and the clip part on the bottom.
If you do have an Integra SRS plug, you cut off the Civic SRS plug and color match the wires from the Civic harness.
- Приборка от Integra DC2 TypeR в Civic EK EJ - 08-SRS.jpg (96.97 КБ) 7470 просмотров
To get the cruise control light to work, all you need to do is cut off the cruise control wire (red/blue) from the green plug and reconnect it with a wire that won't be used on the Integra cluster. For EKs, you can depin the Pink wire (washer fluid), cut the wire leaving the metal pin and some wire left, reconnect it with the cruise control wire, and repin into the cruise control slot on the Integra plug. Your cruise control light will now light up when engaged.
Those with a 92-95 Civic, cut off the cruise control wire from the green plug and take the Blue/White (low fuel light) wire with pin, then connect the cruise control wire to it. Once that is done, stick it in the cruise control slot of the Integra plug.
Those with ABS
For the 94-97 Integra clusters, the ABS wire is pinned into the 16-pin plug. Like with the cruise control modification (using an unused wire), cut off the Civic ABS wire, connect it, and pin it. For the 98-01 Integra clusters, the ABS is wired into the SRS plug. You will need to get the 98-01 Integrs SRS plug and connect the ABS wire from the Civic to the ABS wire from the plug.
Repinning a 96-00 Civic for an Integra cluster
The repinning process will only work on EK Civics because they use the same plugs as Integras. The EG wire pins are too large to fit into the EK Civic/Integra cluster plugs.
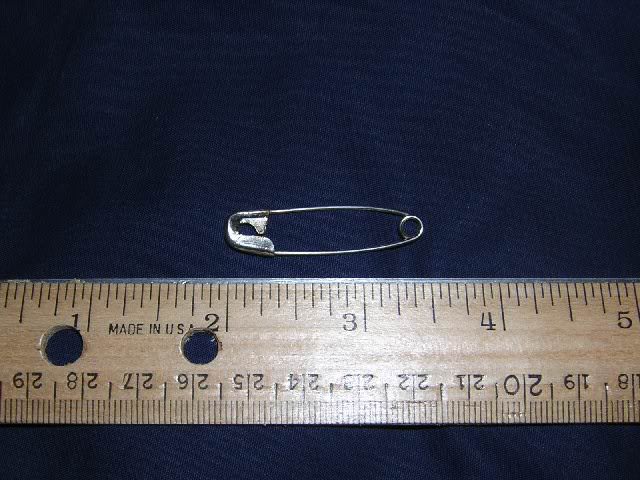
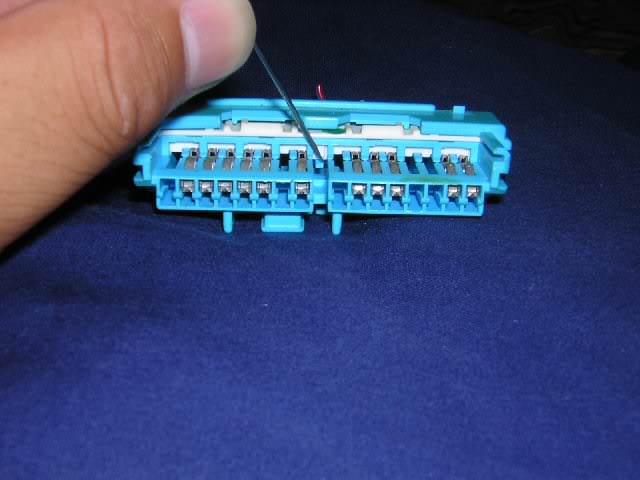
1. Get a medium sized safety pin. Large enough to be sturdy so it doesn't bend when trying to remove the wire and small enough to fit inside the pinhole.
- Приборка от Integra DC2 TypeR в Civic EK EJ - 09.jpg (57.29 КБ) 7470 просмотров
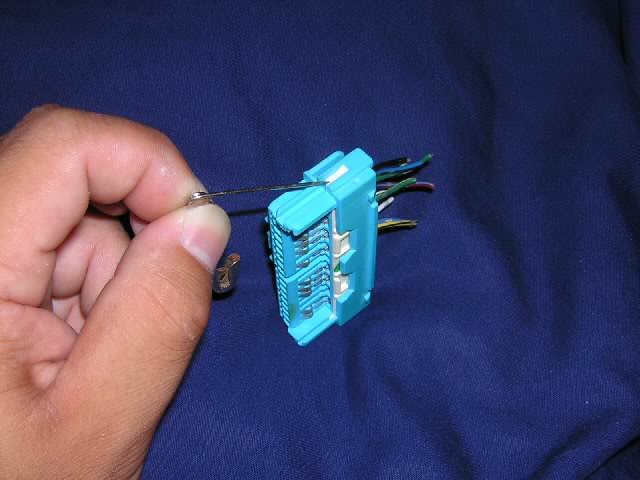
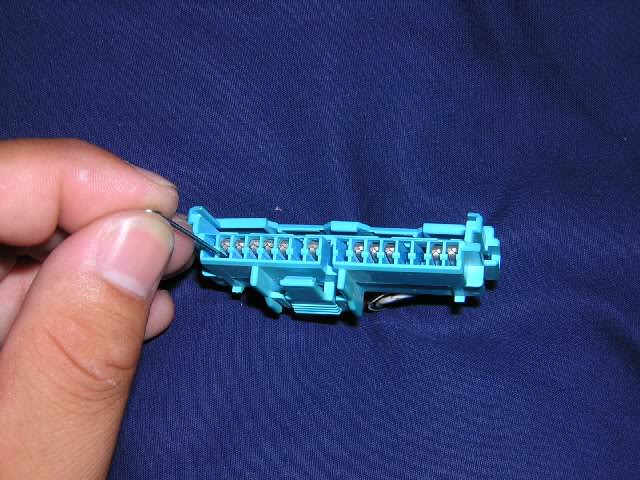
On the left side of the plug, you will see a white clip. Use the safety pin and push it in to unclip it from the blue plug. If it breaks, it is ok; these clips break easy.
- Приборка от Integra DC2 TypeR в Civic EK EJ - 10.jpg (43.03 КБ) 7470 просмотров
On the right side, there's another white clip. Do the same thing as you did in the second step.

- Приборка от Integra DC2 TypeR в Civic EK EJ - 11.jpg (42 КБ) 7470 просмотров
In the middle of the blue plug, there's a small hook to attaches to the white piece. Take the safety pin and push that hook down. You should hear a 'click'.
- Приборка от Integra DC2 TypeR в Civic EK EJ - 12.jpg (31.46 КБ) 7470 просмотров
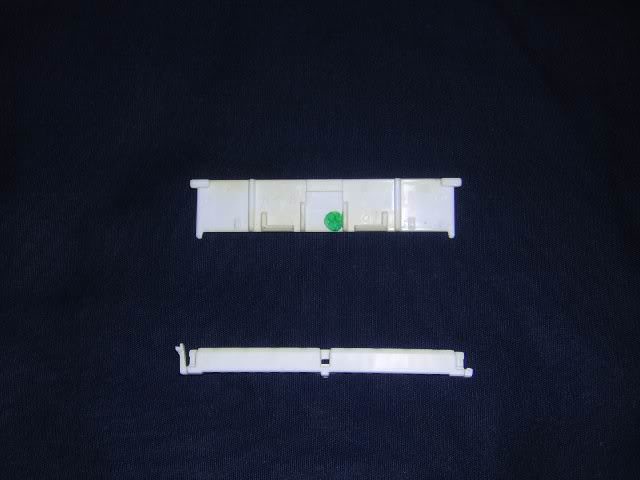
Now, use your fingers and remove the top white piece. You will have to lift up the blue plug bridge on the top because the white piece has ridges that you have to clear. Once you attempt to remove it, you will know what I am talking about.
- Приборка от Integra DC2 TypeR в Civic EK EJ - 13.jpg (52.2 КБ) 7470 просмотров
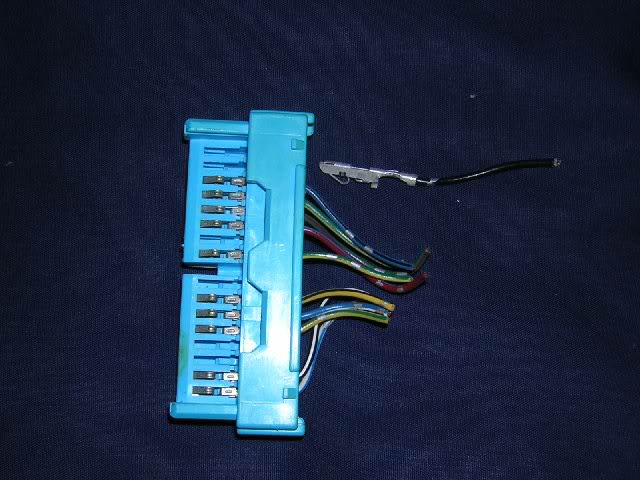
Now the bottom piece can slide out. You might need to use the safety pin to push that piece out. With this piece removed, you can now remove the wires from each pinhole.
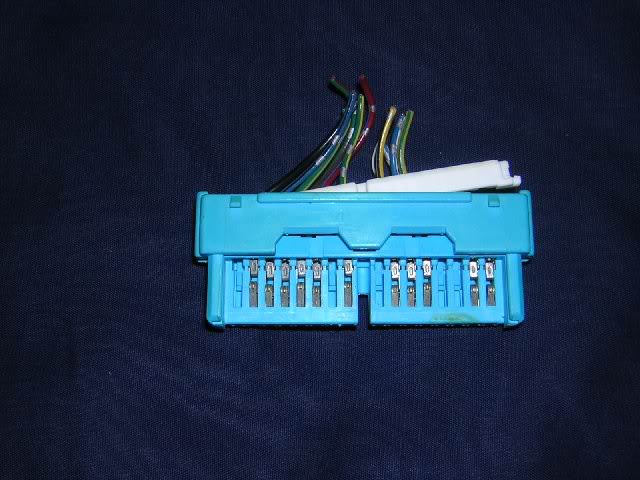
- Приборка от Integra DC2 TypeR в Civic EK EJ - 14.jpg (46.14 КБ) 7470 просмотров
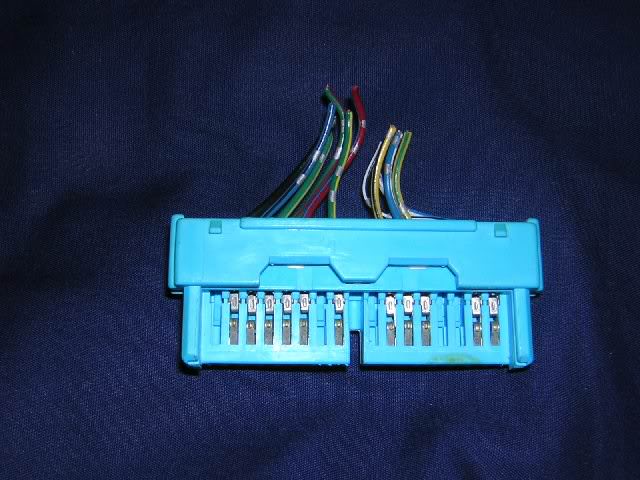
Here are the two white pieces are removed. As you can see I broke one of the white clips. Again, the clips won't affect the wiring at all. I happened to removed these plugs from a Civic at a junkyard and it rains a lot here making the plastic brittle.
- Приборка от Integra DC2 TypeR в Civic EK EJ - 15.jpg (24.23 КБ) 7470 просмотров
Look inside one of the pinholes. You will see more small hooks just like the one you seen in step 4. Take your little safety pin tool and insert it into the pinhole and try to push the hook down while pulling the wire gently. You have to wedge the pintip between the top of the plastic hook and the bottom of the metal wire pin. The wire will slide out when you have done it right. Remember a larger safety pin will make this step a little more difficult.
- Приборка от Integra DC2 TypeR в Civic EK EJ - 16.jpg (70.6 КБ) 7470 просмотров
Here is a picture of one of the wires removed. Now that you know how to remove the wires, following the above diagrams and repin. The wires will slide back into the pinhole. Give the wire a little tug to make sure the wires are in there firmly. Good luck!
- Приборка от Integra DC2 TypeR в Civic EK EJ - 17.jpg (48.45 КБ) 7470 просмотров
Unlike the Integra cluster and 96-00 Civic cluster, the 92-95 Civic cluster plugs are completely different. You will not be able to repin the plugs. You will need to cut off the Integra/96-00 Civic cluster plugs leaving at least 5 inches of wire. If you have 96-00 Civic plugs and putting in an Integra cluster, you will need to repin the wires on the plug according to the Integra plug pinout. Vice versa if you have Integra plugs and swapping in a 96-00 Civic cluster. Now, you need to cut off the 92-95 Civic cluster plugs from your harness. Finally, you match the wires from the harness to the wires coming out of the Integra/96-00 Civic plug as in the diagram and connect them either by solder or butt connectors.
Results
Here are two pictures of my work in two EKs. Of course they won't have the best fitment, but close enough. I used pipe strapping to hold up the cluster, without it, there will be an even larger gap at the top. There will be a small gap at the top due to the cluster sitting further back from the gauge bezel.
- Приборка от Integra DC2 TypeR в Civic EK EJ - 18.jpg (36.07 КБ) 7470 просмотров
- Приборка от Integra DC2 TypeR в Civic EK EJ - 19.jpg (33.85 КБ) 7470 просмотров
- Приборка от Integra DC2 TypeR в Civic EK EJ - 20.jpg (23.56 КБ) 7470 просмотров
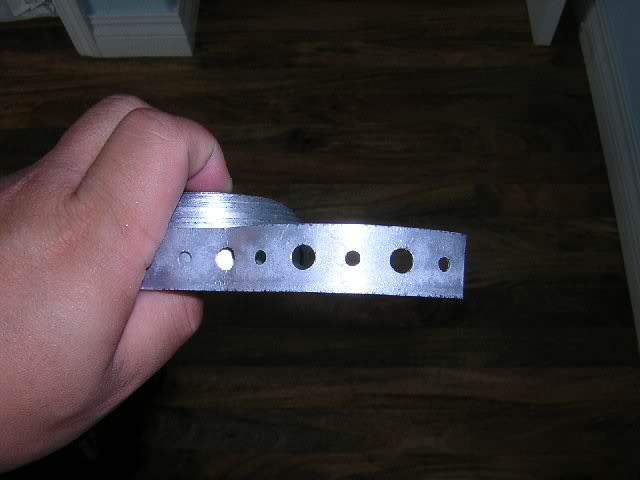
3/4" Pipe Strapping. I cut two pieces maybe 1.5-2" in length leaving the 2 small and 2 larges holes in tact. With the small hole to the edge, I trimmed a little of the two sharp corners so that the piece of strap can swivel to get a good mounting angle. Without the trimming, the piece will not be able to swivel. Using a small bolt and nut, the piece of strap is mounted to the cluster holes. Next, with the large hole at one end, I trimmed the outside corner when looking at the piece. Now, using screws, screw in the two pieces of pipe strapping to the screw locations.
Although not using pipe strapping, the following setup is similar to how I had it with the pipe strapping. The pipe strapping was a little wider than the brackets used below, so I had to trim the corners so they wouldn't rub with the cluster and mounting locations (you'll understand when you get there).
Source: Merritt Johnson (
http://www.merritr.com)